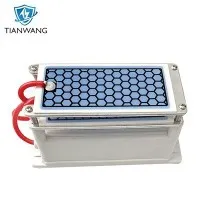
Installing an ozone generator can be a straightforward process if you follow the right steps. As a supplier of 10g ozone generators, I'm here to guide you through the installation process. Ozone generators are useful devices that can help purify the air, eliminate odors, and even sterilize spaces. A 10g ozone generator is a popular choice for medium - sized areas, offering a good balance between ozone output and energy consumption.
Step 1: Choose the Right Location
The first step in installing your 10g ozone generator is to select an appropriate location. Ozone is a powerful oxidizing agent, and you need to ensure that the area where you place the generator is well - ventilated. Avoid placing it in areas where people or animals are present during operation, as high levels of ozone can be harmful to living organisms.
A good location could be a storage room, a basement, or a garage. If you're using it in a commercial setting, it could be placed in a stockroom or a non - occupied office area. Make sure the surface where you place the generator is flat and stable. This will prevent the generator from tipping over and causing damage.
Step 2: Check the Power Supply
Before you plug in your 10g ozone generator, it's crucial to check the power supply. Most 10g ozone generators are designed to work with a standard 220V power outlet. However, it's always a good idea to double - check the specifications of your generator.
If you're using an extension cord, make sure it's in good condition and has the appropriate amperage rating. A damaged extension cord can pose a fire hazard. Also, ensure that the power outlet you're using is properly grounded. This will protect you and the generator from electrical shocks.
Step 3: Unpack and Inspect the Generator
Once you've chosen the location and checked the power supply, it's time to unpack the 10g ozone generator. Carefully remove the generator from its packaging and inspect it for any visible damage. Check the power cord, the control panel, and the ozone output ports.
If you notice any damage, contact the supplier immediately. It's important to address any issues before you start using the generator. At this point, you can also familiarize yourself with the components of the generator, such as the timer, the ozone output adjustment knob, and the indicator lights.
Step 4: Connect the Generator to the Power Source
After inspecting the generator, connect it to the power source. Plug the power cord into the appropriate outlet. Once you've plugged it in, you may see some indicator lights on the control panel. These lights usually indicate that the generator is receiving power.
Some 10g ozone generators have a switch on the control panel. Turn this switch on to start the generator. You may also need to set the timer and the ozone output level according to your needs. For example, if you're using the generator to eliminate odors in a small room, you may want to set a lower ozone output level and a shorter timer.
Step 5: Set the Ozone Output and Timer
Setting the ozone output and timer is an important step in using your 10g ozone generator effectively. The ozone output is usually measured in grams per hour (g/h). A 10g ozone generator can produce up to 10 grams of ozone per hour.
The timer allows you to control how long the generator runs. It's recommended to start with a short timer, such as 30 minutes, especially if you're using the generator in a small area. This will help you avoid over - producing ozone. You can gradually increase the timer and the ozone output as you become more familiar with the generator.
Step 6: Monitor the Generator
Once the generator is running, it's important to monitor it. Check the indicator lights on the control panel to ensure that the generator is working properly. You may also notice a slight smell of ozone in the air. This is normal, but if the smell is too strong, it could indicate that the ozone output is too high.
If you experience any problems, such as the generator shutting off unexpectedly or making strange noises, turn off the generator immediately and contact the supplier for assistance.
Step 7: Post - Operation Precautions
After the generator has finished running, it's important to take some post - operation precautions. Open the windows and doors to ventilate the area thoroughly. Ozone can break down into oxygen over time, but it's still a good idea to let fresh air in to remove any remaining ozone.
Do not enter the area until the ozone level has dropped to a safe level. You can use an ozone detector to measure the ozone level in the air. Once the ozone level is below the safe limit, it's safe to enter the area.
Comparison with Other Ozone Generators
If you're still considering different ozone generators, it's worth comparing the 10g ozone generator with other models. For smaller areas, a 5g Ozone generator may be sufficient. It has a lower ozone output, which is suitable for small rooms or closets.
On the other hand, if you have a larger area to purify, such as a large warehouse or a commercial building, a 20g Portable Ozone Generator Air Sterilizer may be a better choice. It can produce more ozone per hour, allowing it to cover a larger space more effectively.


However, for most medium - sized areas, a 10g ozone generator Cleaner Ozonizer Odor Eliminator offers a great balance between performance and cost.
Conclusion
Installing a 10g ozone generator is a relatively simple process if you follow the steps outlined above. By choosing the right location, checking the power supply, unpacking and inspecting the generator, connecting it to the power source, setting the ozone output and timer, monitoring the generator, and taking post - operation precautions, you can ensure that your ozone generator works effectively and safely.
If you're interested in purchasing a 10g ozone generator or have any questions about the installation process, feel free to contact us for further details and to start a procurement discussion. We're here to provide you with the best products and support to meet your air purification needs.
References
- Ozone Generator User Manuals
- Scientific studies on ozone generation and air purification